Manim’s building blocks
This document explains the building blocks of manim and will give you all the necessary tools to start producing your own videos.
Essentially, manim puts at your disposal three different concepts that you can
orchestrate together to produce mathematical animations: the
mathematical object (or mobject for short), the animation, and the
scene. As we will see in the following sections, each of these three
concepts is implemented in manim as a separate class: the Mobject,
Animation, and Scene classes.
Note
It is recommended that you read the tutorials Quickstart and Manim’s Output Settings before reading this page.
Mobjects
Mobjects are the basic building blocks for all manim animations. Each class
that derives from Mobject represents an object that can be displayed
on the screen. For example, simple shapes such as Circle,
Arrow, and Rectangle are all mobjects. More complicated
constructs such as Axes, FunctionGraph, or
BarChart are mobjects as well.
If you try to display an instance of Mobject on the screen, you will only
see an empty frame. The reason is that the Mobject class is an
abstract base class of all other mobjects, i.e. it does not have any
pre-determined visual shape that can be displayed on the screen. It is only the
skeleton of a thing that could be displayed. Therefore, you will rarely need
to use plain instances of Mobject; instead, you will most likely
create instances of its derived classes. One of these derived classes is
VMobject. The V stands for Vectorized Mobject. In essence, a
vmobject is a mobject that uses vector graphics to be displayed. Most of
the time, you will be dealing with vmobjects, though we will continue to use
the term “mobject” to refer to the class of shapes that can be displayed on the
screen, as it is more general.
Note
Any object that can be displayed on the screen is a mobject, even if
it is not necessarily mathematical in nature.
Tip
To see examples of classes derived from Mobject, see the
geometry module. Most of these are in fact derived from
VMobject as well.
Creating and displaying mobjects
As explained in Quickstart, usually all of the code in a manim
script is put inside the construct() method of a Scene class.
To display a mobject on the screen, call the add() method of the
containing Scene. This is the principal way of displaying a mobject
on the screen when it is not being animated. To remove a mobject from the
screen, simply call the remove() method from the containing
Scene.
Example: CreatingMobjects 
from manim import *

class CreatingMobjects(Scene):
    def construct(self):
        circle = Circle()
        self.add(circle)
        self.wait(1)
        self.remove(circle)
        self.wait(1)
class CreatingMobjects(Scene):
    def construct(self):
        circle = Circle()
        self.add(circle)
        self.wait(1)
        self.remove(circle)
        self.wait(1)
Placing mobjects
Let’s define a new Scene called Shapes and add()
some mobjects to it. This script generates a static picture that displays a
circle, a square, and a triangle:
Example: Shapes 
from manim import *

class Shapes(Scene):
    def construct(self):
        circle = Circle()
        square = Square()
        triangle = Triangle()

        circle.shift(LEFT)
        square.shift(UP)
        triangle.shift(RIGHT)

        self.add(circle, square, triangle)
        self.wait(1)
class Shapes(Scene):
    def construct(self):
        circle = Circle()
        square = Square()
        triangle = Triangle()

        circle.shift(LEFT)
        square.shift(UP)
        triangle.shift(RIGHT)

        self.add(circle, square, triangle)
        self.wait(1)
By default, mobjects are placed at the center of coordinates, or origin, when
they are first created. They are also given some default colors. Further, the
Shapes scene places the mobjects by using the shift() method. The
square is shifted one unit in the UP direction from the origin, while the
circle and triangle are shifted one unit LEFT and RIGHT, respectively.
Attention
Unlike other graphics software, manim places the center of
coordinates at the center of the screen. The positive vertical
direction is up, and the positive horizontal direction is right.
See also the constants ORIGIN, UP, DOWN, LEFT,
RIGHT, and others, defined in the constants module.
There are many other possible ways to place mobjects on the screen, for example
move_to(), next_to(), and align_to(). The next scene
MobjectPlacement uses all three.
Example: MobjectPlacement 
from manim import *

class MobjectPlacement(Scene):
    def construct(self):
        circle = Circle()
        square = Square()
        triangle = Triangle()

        # place the circle two units left from the origin
        circle.move_to(LEFT * 2)
        # place the square to the left of the circle
        square.next_to(circle, LEFT)
        # align the left border of the triangle to the left border of the circle
        triangle.align_to(circle, LEFT)

        self.add(circle, square, triangle)
        self.wait(1)
The move_to() method uses absolute units (measured relative to the
ORIGIN), while next_to() uses relative units (measured from the
mobject passed as the first argument). align_to() uses LEFT not as
measuring units but as a way to determine the border to use for alignment. The
coordinates of the borders of a mobject are determined using an imaginary
bounding box around it.
Tip
Many methods in manim can be chained together. For example the two lines
square = Square()
square.shift(LEFT)
can be replaced by
square = Square().shift(LEFT)
Technically, this is possible because most methods calls return the modified mobject.
Styling mobjects
The following scene changes the default aesthetics of the mobjects.
Example: MobjectStyling 
from manim import *

class MobjectStyling(Scene):
    def construct(self):
        circle = Circle().shift(LEFT)
        square = Square().shift(UP)
        triangle = Triangle().shift(RIGHT)

        circle.set_stroke(color=GREEN, width=20)
        square.set_fill(YELLOW, opacity=1.0)
        triangle.set_fill(PINK, opacity=0.5)

        self.add(circle, square, triangle)
        self.wait(1)
This scene uses two of the main functions that change the visual style of a
mobject: set_stroke() and set_fill(). The former changes the
visual style of the mobject’s border while the latter changes the style of the
interior. By default, most mobjects have a fully transparent interior so you
must specify the opacity parameter to display the color. An
opacity of 1.0 means fully opaque, while 0.0 means fully transparent.
Only instances of VMobject implement set_stroke() and
set_fill(). Instances of Mobject implement
set_color() instead. The vast majority of pre-defined classes
are derived from VMobject so it is usually safe to assume that you
have access to set_stroke() and set_fill().
Mobject on-screen order
The next scene is exactly the same as the MobjectStyling scene from the
previous section, except for exactly one line.
Example: MobjectZOrder 
from manim import *

class MobjectZOrder(Scene):
    def construct(self):
        circle = Circle().shift(LEFT)
        square = Square().shift(UP)
        triangle = Triangle().shift(RIGHT)

        circle.set_stroke(color=GREEN, width=20)
        square.set_fill(YELLOW, opacity=1.0)
        triangle.set_fill(PINK, opacity=0.5)

        self.add(triangle, square, circle)
        self.wait(1)
The only difference here (besides the scene name) is the order in which the
mobjects are added to the scene. In MobjectStyling, we added them as
add(circle, square, triangle), whereas in MobjectZOrder we add them as
add(triangle, square, circle).
As you can see, the order of the arguments of add() determines
the order that the mobjects are displayed on the screen, with the left-most
arguments being put in the back.
Animations
At the heart of manim is animation. Generally, you can add an animation to
your scene by calling the play() method.
Example: SomeAnimations 
from manim import *

class SomeAnimations(Scene):
    def construct(self):
        square = Square()

        # some animations display mobjects, ...
        self.play(FadeIn(square))

        # ... some move or rotate mobjects around...
        self.play(Rotate(square, PI/4))

        # some animations remove mobjects from the screen
        self.play(FadeOut(square))

        self.wait(1)
Put simply, animations are procedures that interpolate between two mobjects.
For example, FadeIn(square) starts with a fully transparent version of
square and ends with a fully opaque version, interpolating between them
by gradually increasing the opacity. FadeOut works in the opposite
way: it interpolates from fully opaque to fully transparent. As another
example, Rotate starts with the mobject passed to it as argument, and
ends with the same object but rotated by a certain amount, this time
interpolating the mobject’s angle instead of its opacity.
Animating methods
Any property of a mobject that can be changed can be animated. In fact, any
method that changes a mobject’s property can be used as an animation, through
the use of animate().
Example: AnimateExample 
from manim import *

class AnimateExample(Scene):
    def construct(self):
        square = Square().set_fill(RED, opacity=1.0)
        self.add(square)

        # animate the change of color
        self.play(square.animate.set_fill(WHITE))
        self.wait(1)

        # animate the change of position and the rotation at the same time
        self.play(square.animate.shift(UP).rotate(PI / 3))
        self.wait(1)
References: Animation
animate() is a property of all mobjects that animates the methods that come
afterward. For example, square.set_fill(WHITE) sets the fill color of
the square, while square.animate.set_fill(WHITE) animates this action.
Animation run time
By default, any animation passed to play() lasts for exactly one second.
Use the run_time argument to control the duration.
Example: RunTime 
from manim import *

class RunTime(Scene):
    def construct(self):
        square = Square()
        self.add(square)
        self.play(square.animate.shift(UP), run_time=3)
        self.wait(1)
class RunTime(Scene):
    def construct(self):
        square = Square()
        self.add(square)
        self.play(square.animate.shift(UP), run_time=3)
        self.wait(1)
Creating a custom animation
Even though Manim has many built-in animations, you will find times when you need to smoothly animate from one state of a Mobject to another.
If you find yourself in that situation, then you can define your own custom animation.
You start by extending the Animation class and overriding its interpolate_mobject().
The interpolate_mobject() method receives alpha as a parameter that starts at 0 and changes throughout the animation.
So, you just have to manipulate self.mobject inside Animation according to the alpha value in its interpolate_mobject method.
Then you get all the benefits of Animation such as playing it for different run times or using different rate functions.
Let’s say you start with a number and want to create a Transform animation that transforms it to a target number.
You can do it using FadeTransform, which will fade out the starting number and fade in the target number.
But when we think about transforming a number from one to another, an intuitive way of doing it is by incrementing or decrementing it smoothly.
Manim has a feature that allows you to customize this behavior by defining your own custom animation.
You can start by creating your own Count class that extends Animation.
The class can have a constructor with three arguments, a DecimalNumber Mobject, start, and end.
The constructor will pass the DecimalNumber Mobject to the super constructor (in this case, the Animation constructor) and will set start and end.
The only thing that you need to do is to define how you want it to look at every step of the animation.
Manim provides you with the alpha value in the interpolate_mobject() method based on frame rate of video, rate function, and run time of animation played.
The alpha parameter holds a value between 0 and 1 representing the step of the currently playing animation.
For example, 0 means the beginning of the animation, 0.5 means halfway through the animation, and 1 means the end of the animation.
In the case of the Count animation, you just have to figure out a way to determine the number to display at the given alpha value and then set that value in the interpolate_mobject() method of the Count animation.
Suppose you are starting at 50 and incrementing until the DecimalNumber reaches 100 at the end of the animation.
If alpha is 0, you want the value to be 50.
If alpha is 0.5, you want the value to be 75.
If alpha is 1, you want the value to be 100.
Generally, you start with the starting number and add only some part of the value to be increment according to the alpha value.
So, the logic of calculating the number to display at each step will be 50 + alpha * (100 - 50).
Once you set the calculated value for the DecimalNumber, you are done.
Note
If you’re creating a custom animation and want to use a rate_func, you must explicitly apply
self.rate_func(alpha) to the parameter you’re animating. For example, try switching the rate
function to rate_functions.there_and_back to observe how it affects the counting behavior.
Once you have defined your Count animation, you can play it in your Scene for any duration you want for any DecimalNumber with any rate function.
Example: CountingScene 
from manim import *

class Count(Animation):
    def __init__(self, number: DecimalNumber, start: float, end: float, **kwargs) -> None:
        # Pass number as the mobject of the animation
        super().__init__(number,  **kwargs)
        # Set start and end
        self.start = start
        self.end = end

    def interpolate_mobject(self, alpha: float) -> None:
        # Set value of DecimalNumber according to alpha
        value = self.start + (self.rate_func(alpha) * (self.end - self.start))
        self.mobject.set_value(value)


class CountingScene(Scene):
    def construct(self):
        # Create Decimal Number and add it to scene
        number = DecimalNumber().set_color(WHITE).scale(5)
        # Add an updater to keep the DecimalNumber centered as its value changes
        number.add_updater(lambda number: number.move_to(ORIGIN))

        self.add(number)

        self.wait()

        # Play the Count Animation to count from 0 to 100 in 4 seconds
        self.play(Count(number, 0, 100), run_time=4, rate_func=linear)

        self.wait()
References: Animation DecimalNumber interpolate_mobject() play()
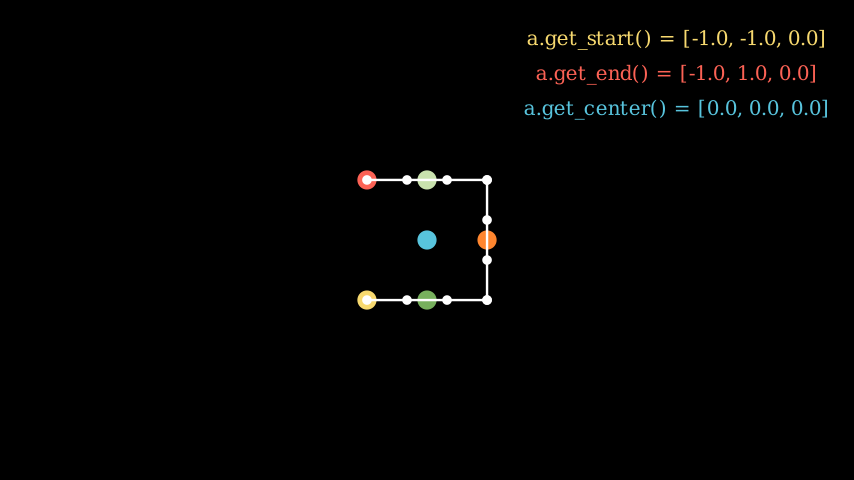
Using coordinates of a mobject
Mobjects contain points that define their boundaries.
These points can be used to add other mobjects respectively to each other,
e.g. by methods like get_center() , get_top()
and get_start(). Here is an example of some important coordinates:
Example: MobjectExample 
from manim import *

class MobjectExample(Scene):
    def construct(self):
        p1 = [-1,-1, 0]
        p2 = [ 1,-1, 0]
        p3 = [ 1, 1, 0]
        p4 = [-1, 1, 0]
        a  = Line(p1,p2).append_points(Line(p2,p3).points).append_points(Line(p3,p4).points)
        point_start  = a.get_start()
        point_end    = a.get_end()
        point_center = a.get_center()
        self.add(Text(f"a.get_start() = {np.round(point_start,2).tolist()}", font_size=24).to_edge(UR).set_color(YELLOW))
        self.add(Text(f"a.get_end() = {np.round(point_end,2).tolist()}", font_size=24).next_to(self.mobjects[-1],DOWN).set_color(RED))
        self.add(Text(f"a.get_center() = {np.round(point_center,2).tolist()}", font_size=24).next_to(self.mobjects[-1],DOWN).set_color(BLUE))

        self.add(Dot(a.get_start()).set_color(YELLOW).scale(2))
        self.add(Dot(a.get_end()).set_color(RED).scale(2))
        self.add(Dot(a.get_top()).set_color(GREEN_A).scale(2))
        self.add(Dot(a.get_bottom()).set_color(GREEN_D).scale(2))
        self.add(Dot(a.get_center()).set_color(BLUE).scale(2))
        self.add(Dot(a.point_from_proportion(0.5)).set_color(ORANGE).scale(2))
        self.add(*[Dot(x) for x in a.points])
        self.add(a)
Transforming mobjects into other mobjects
It is also possible to transform a mobject into another mobject like this:
Example: ExampleTransform 
from manim import *

class ExampleTransform(Scene):
    def construct(self):
        self.camera.background_color = WHITE
        m1 = Square().set_color(RED)
        m2 = Rectangle().set_color(RED).rotate(0.2)
        self.play(Transform(m1,m2))
class ExampleTransform(Scene):
    def construct(self):
        self.camera.background_color = WHITE
        m1 = Square().set_color(RED)
        m2 = Rectangle().set_color(RED).rotate(0.2)
        self.play(Transform(m1,m2))
The Transform function maps points of the previous mobject to the points of the next mobject. This might result in strange behaviour, e.g. when the dots of one mobject are arranged clockwise and the other points are arranged counterclockwise. Here it might help to use the flip function and reposition the points via the roll function of numpy:
Example: ExampleRotation 
from manim import *

class ExampleRotation(Scene):
    def construct(self):
        self.camera.background_color = WHITE
        m1a = Square().set_color(RED).shift(LEFT)
        m1b = Circle().set_color(RED).shift(LEFT)
        m2a = Square().set_color(BLUE).shift(RIGHT)
        m2b = Circle().set_color(BLUE).shift(RIGHT)

        points = m2a.points
        points = np.roll(points, int(len(points)/4), axis=0)
        m2a.points = points

        self.play(Transform(m1a,m1b),Transform(m2a,m2b), run_time=1)
Scenes
The Scene class is the connective tissue of manim. Every mobject has
to be added to a scene to be displayed, or removed from it to cease being displayed. Every animation has to be
played by a scene, and every time interval where no
animation occurs is determined by a call to wait(). All of the
code of your video must be contained in the construct() method of
a class that derives from Scene. Finally, a single file may contain
multiple Scene subclasses if multiple scenes are to be
rendered at the same time.